RDP Remote Desktop
RDP (Remote Desktop Protocol) is a graphical remote desktop connection method. A Windows host can use the built-in “Remote Desktop Connection” tool to access the Debian desktop of a Quectel Pi development board (M1/L1), and remotely view or control the graphical interface.
The Quectel Pi M1 primarily uses the GNOME desktop environment, which has integrated GNOME remote desktop functionality, requiring no additional installation of software such as VNC, Xvfb, or x11vnc. The Quectel Pi L1 currently uses the Weston graphical environment and can provide remote desktop services through Weston’s built-in RDP backend.
💡 Note: When using RDP remote desktop connection on M1, the graphical desktop session must remain logged in. For L1’s RDP, it is recommended to use Weston’s
rdp-backend.so.
Preparation
Verify the device environment:
The Quectel Pi M1 / L1 has booted into the Debian system;
The Windows host and the development board are on the same subnet or within a reachable network on the same LAN;
The Windows host has the “Remote Desktop Connection” tool installed or enabled.
It is recommended to access the development board via serial port. For detailed instructions on serial connection, refer to debug_uart.md. For M1, please log in using the account and password you created by following the setup guide; L1 defaults to logging in as the
rootuser with no password. If the local debugging environment is already available, you can also access the system via ADB (L1).Obtain the device IP address. Execute on the development board:
hostname -I
Record the IP address under the current network; this address will be needed later for the Windows Remote Desktop connection.
💡 Note: The Windows host and the development board must be on the same subnet or LAN, and the networks at both ends must be able to communicate. Otherwise, even if the board has started the RDP service, the connection cannot be established normally.
If you plan to use a regular user q to start the RDP service (L1), you can first create the user and set a password:
adduser --disabled-password --gecos "" q
echo 'q:q' | chpasswd
If a usable regular user already exists on the system, you can directly reuse that existing user without creating a new one.
M1: GNOME Remote Desktop
Software Installation
The GNOME desktop environment of the Quectel Pi M1 Debian system has integrated remote desktop-related functionality. Typically, no additional installation of software such as VNC, Xvfb, or x11vnc is needed.
You can execute the following command in the terminal to confirm whether the remote desktop management tool exists:
which grdctl
If the command returns /bin/grdctl, it indicates that the system already includes the GNOME remote desktop management tool.
Software Configuration
Enter the remote desktop settings interface. Through the Quectel Pi M1 graphical interface, navigate to: Settings > System > Remote Desktop
Enable the remote desktop feature. In the remote desktop settings interface, you can enable the following toggles according to your actual usage needs:
Desktop Sharing: Allows other devices to view the current desktop via the RDP protocol.
Remote Control: Allows the remote connecting end to control the mouse and keyboard.
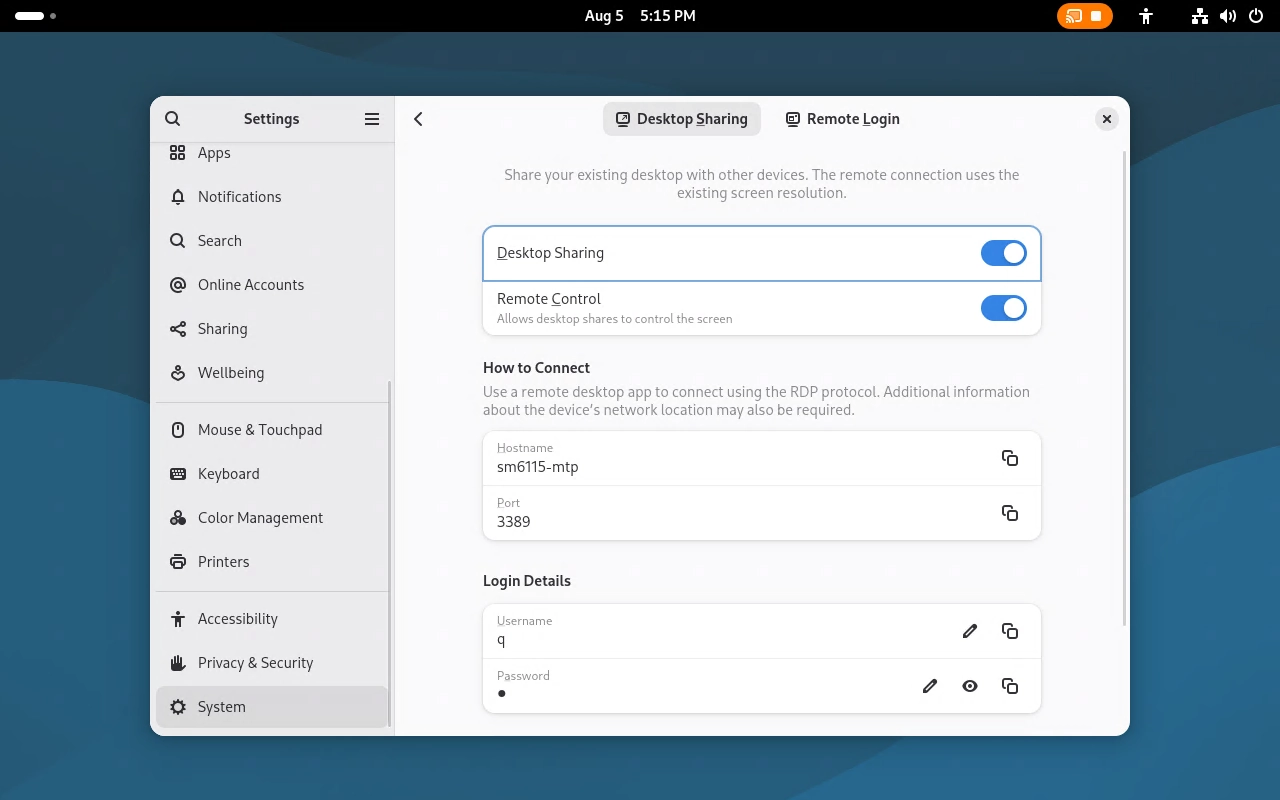
View connection information. In the remote desktop settings interface, you can view the following information: hostname (for identifying the device within the LAN), port (the default RDP port is
3389), username, and password. If you need to change the login password, click the edit button to the right of the password area and reset it following the on-screen prompts.
Keeping the Remote Desktop Login Password
If you only change the login password on the system settings Remote Desktop page, you may need to set it again after the device restarts or you re-login. If you want the remote desktop login password to remain available, you can modify the Login keyring password using the Passwords and Keys tool.
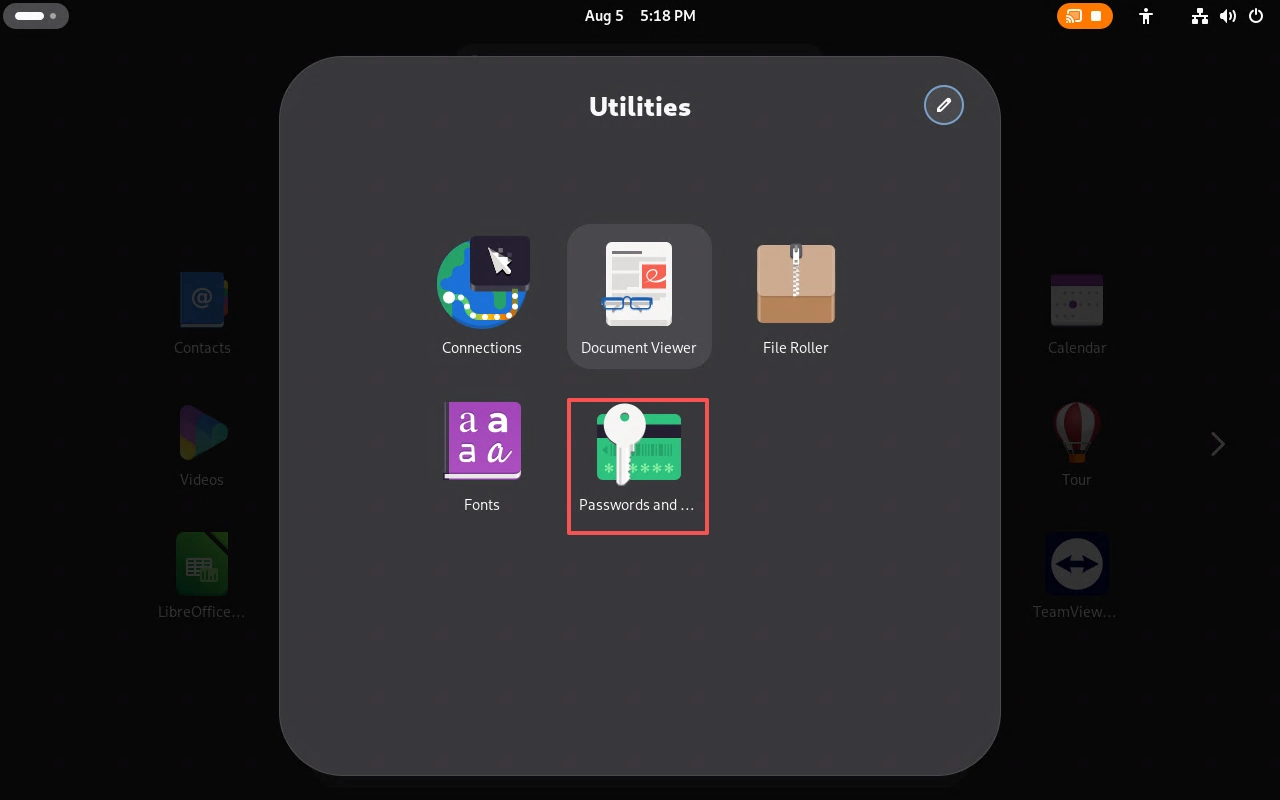
Open Utilities in the application list, then click Passwords and Keys.
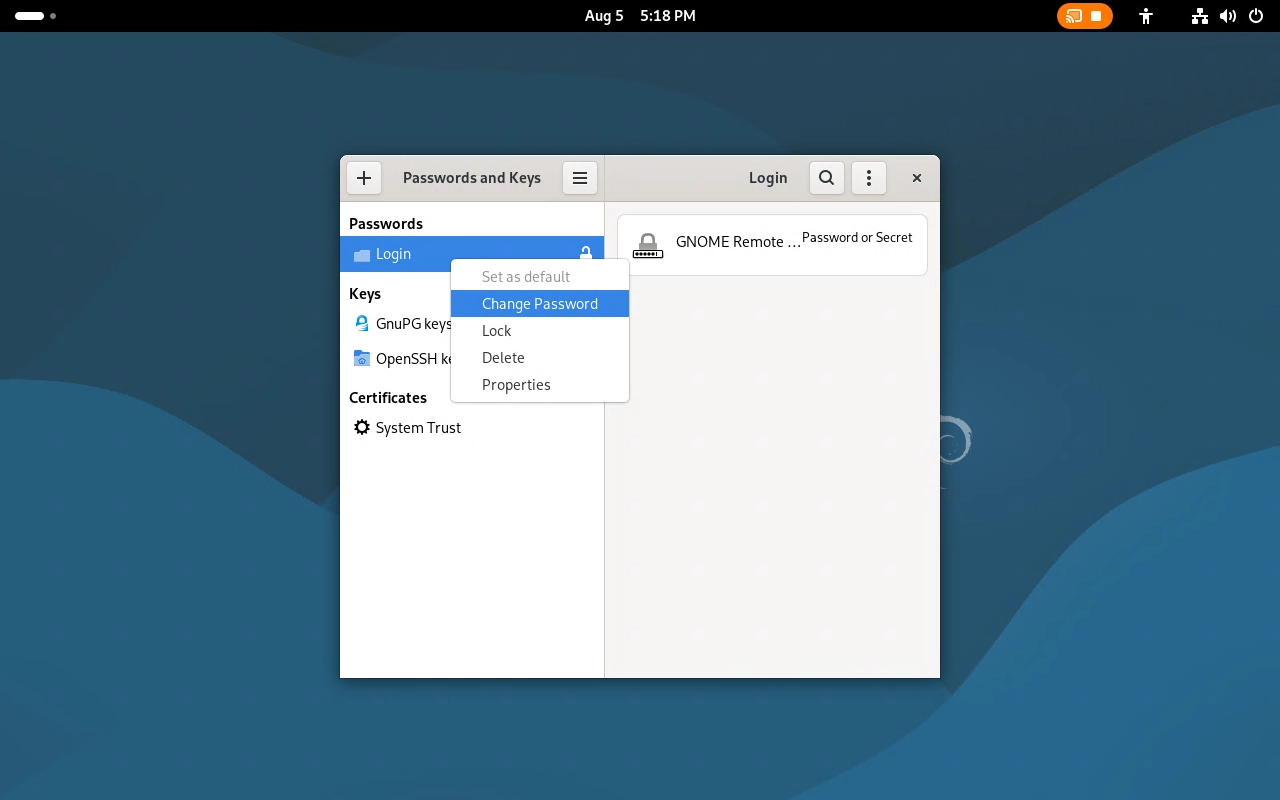
Under the Passwords category, select
Login, right-click the remote desktop credential, and choose Change Password.
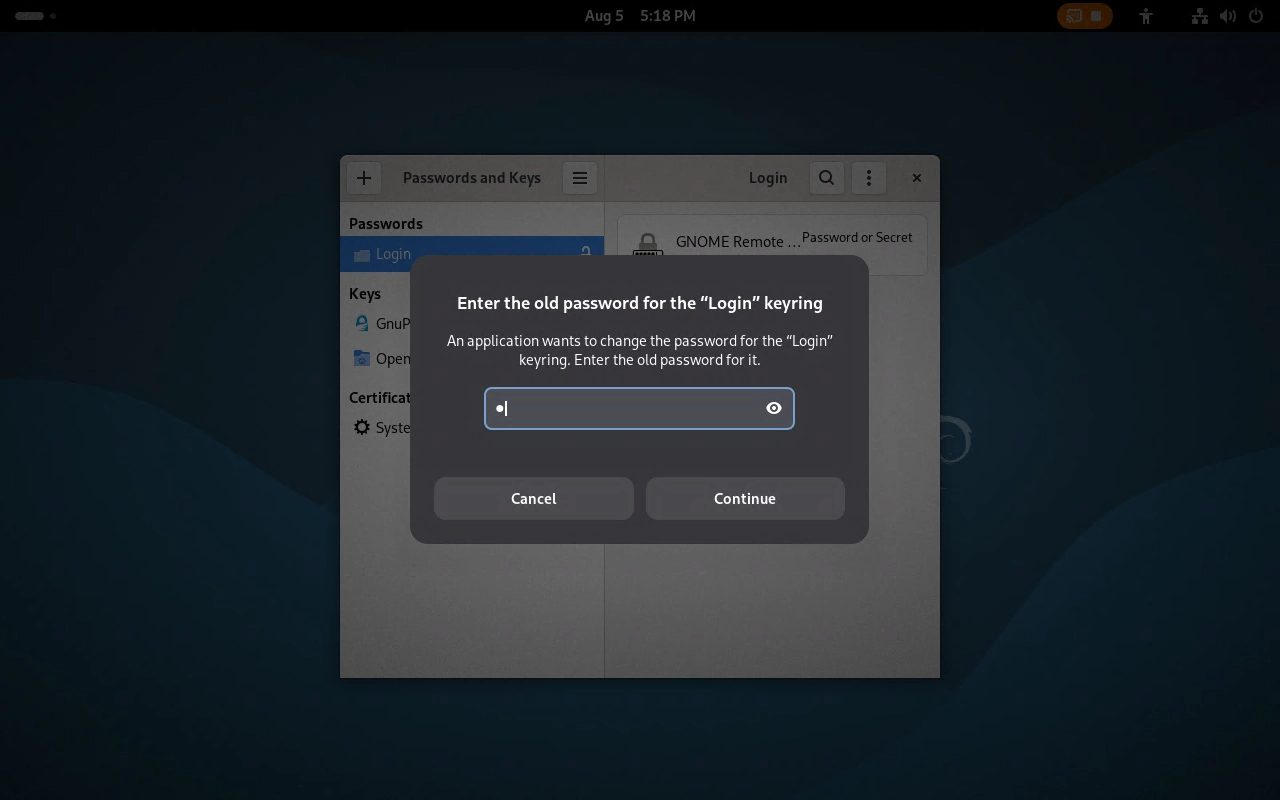
Enter the old password. The old password is the remote login password previously configured in the remote desktop settings, for example,
qas set in the test environment of this document.
Set a new
Loginkeyring password. If you want the remote desktop credentials to be read automatically after system login, you can leave the new password blank and click Continue.If the new password is left blank, the system will warn that the password will be stored in unencrypted form. After confirming, click Continue.
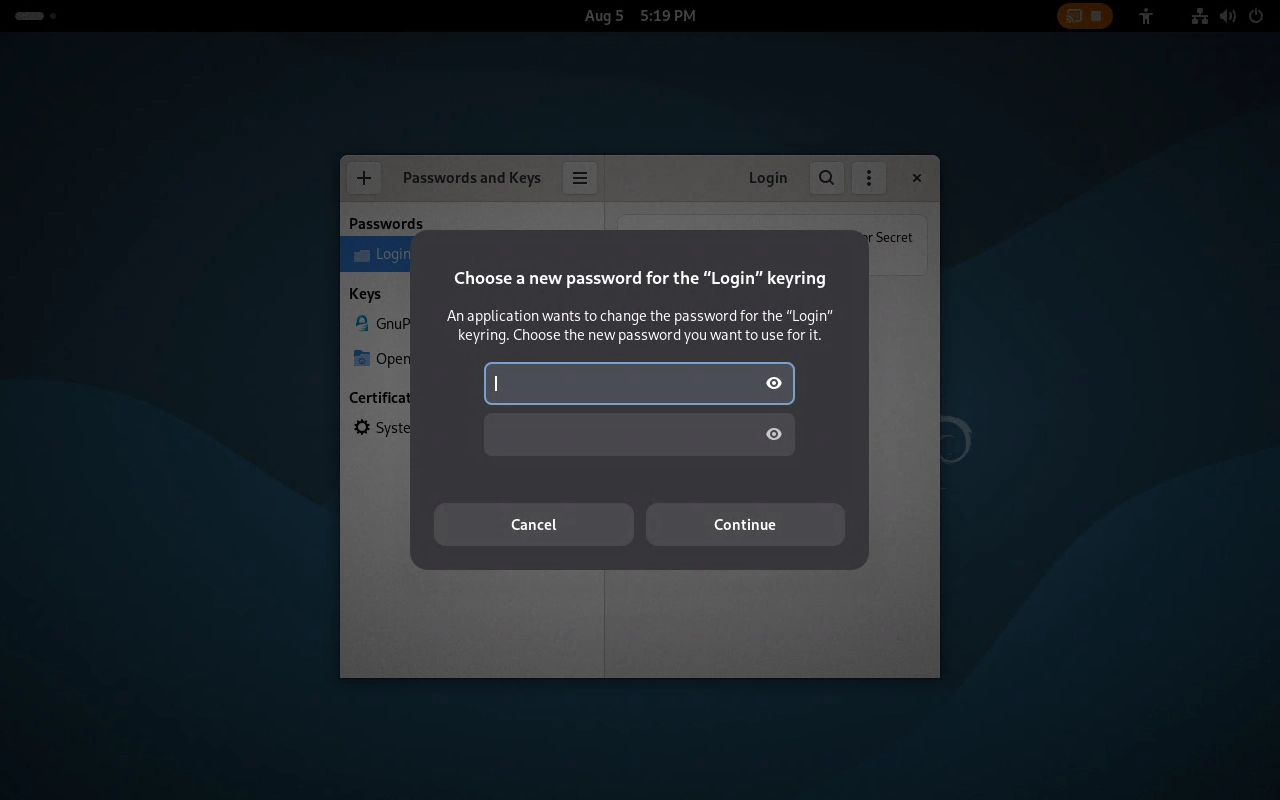
💡 Note: Setting the
Loginkeyring password to blank reduces credential security and is recommended only for development and debugging environments. If the device is used in a production environment or a multi-user shared environment, it is recommended to set a non-empty password and manually unlock the keyring as needed.
Software Startup
After enabling Desktop Sharing in the graphical interface, the GNOME remote desktop service will start automatically.
You can also check the current status using the following command in the terminal:
grdctl status --show-credentials
Under normal circumstances, you will see information such as RDP-related status, port, username, and remote control mode.
If you need to enable the RDP backend via the command line, execute:
grdctl rdp enable
If you need to allow the remote end to control the mouse and keyboard, execute:
grdctl rdp disable-view-only
If you only allow the remote end to view the desktop without controlling the mouse and keyboard, execute:
grdctl rdp enable-view-only
💡 Note: In actual use, it is recommended to prioritize configuration through the graphical interface to avoid inconsistency between command-line configuration and the displayed interface state.
L1: Weston RDP Backend
Software Installation
Check whether Weston supports the RDP backend:
env LD_LIBRARY_PATH=/opt/qcom/lib:/lib weston --help | grep -i rdp
find /usr/lib* -name 'rdp-backend.so' 2>/dev/null
If you can see rdp-backend.so, it indicates that the current system already includes the Weston RDP backend.
💡 Note: The
westonbinary in the current Quectel Pi L1 image depends on runtime libraries under/opt/qcom/lib. If executingwestondirectly promptslibweston-10.so.0: cannot open shared object file, you need to prependLD_LIBRARY_PATH=/opt/qcom/lib:/libto the command.
Software Configuration
Configuring RDP Certificates
The Weston RDP backend requires a TLS certificate and private key. You can choose the certificate storage location based on the user starting the service.
If using root to start the RDP service, you can generate certificates to /etc/weston:
mkdir -p /etc/weston
openssl req -x509 -newkey rsa:2048 -nodes \\
  -keyout /etc/weston/rdp.key \\
  -out /etc/weston/rdp.crt \\
  -days 365 \\
  -subj "/CN=quectel-pi-l1"
chmod 600 /etc/weston/rdp.key
chmod 644 /etc/weston/rdp.crt
If using a regular user q to start the RDP service, you can generate certificates to /home/q:
mkdir -p /home/q
openssl req -x509 -newkey rsa:2048 -nodes \\
  -keyout /home/q/weston-rdp.key \\
  -out /home/q/weston-rdp.crt \\
  -days 365 \\
  -subj "/CN=quectel-pi-l1"
chown q:q /home/q/weston-rdp.key /home/q/weston-rdp.crt
chmod 600 /home/q/weston-rdp.key
chmod 644 /home/q/weston-rdp.crt
If usable certificates already exist on the system, you can also directly reuse the existing certificate paths.
Software Startup
Recommended Method: Sharing the Current Physical Screen
If you want the RDP connection to display the same Weston screen as on the local MIPI/HDMI display, you should enable Weston’s screen-share.so module. This method allows the local Weston to automatically launch an RDP sharing process, making it suitable for remotely viewing and operating the current physical screen.
Execute the following command to modify /etc/xdg/weston/weston.ini:
python3 - <<'PY'
from pathlib import Path

p = Path("/etc/xdg/weston/weston.ini")
s = p.read_text()

s = s.replace("#modules=screen-share.so", "modules=screen-share.so")
s = s.replace("--rdp-tls-cert=/data/misc/display/tls.crt", "--rdp-tls-cert=/etc/weston/rdp.crt")
s = s.replace("--rdp-tls-key=/data/misc/display/tls.key", "--rdp-tls-key=/etc/weston/rdp.key")
s = s.replace("start-on-startup=false", "start-on-startup=true")

p.write_text(s)
PY
After modification, restart the system:
reboot
After the system restarts, check the Weston and RDP sharing processes:
ps -ef | grep weston
netstat -ltnp | grep 3389
cat /tmp/weston-rdp-share.log
If you can see processes similar to the following, it indicates that the local Weston has automatically started RDP sharing:
weston --idle-time=0 --log=/tmp/weston.log --config=/etc/xdg/weston/weston.ini --tty=1
weston --backend=rdp-backend.so --no-config --shell=fullscreen-shell.so --no-clients-resize --address=0.0.0.0 --rdp-tls-cert=/etc/weston/rdp.crt --rdp-tls-key=/etc/weston/rdp.key --log=/tmp/weston-rdp-share.log
At this point, the Windows host can directly use Remote Desktop to connect to the development board’s IP address. This method shares the current physical screen display, and there is no need to manually execute weston --backend=rdp-backend.so.
💡 Note: The
screen-sharemethod depends on the[screen-share]section in the local Weston configuration. If the certificate paths differ on your system, replace/etc/weston/rdp.crtand/etc/weston/rdp.keyin the command with the actual paths.
Temporarily Starting the RDP Service
The Weston RDP backend can also be used to temporarily start an independent RDP desktop using root or a regular user q:
rootstartup: Suitable for the initial L1 environment and quick verification after serial root login.qstartup: Suitable for daily use after a regular user has been created.
This method creates a new Weston RDP desktop and does not mirror the local MIPI/HDMI physical screen. If you need to remotely share the current physical screen, please use the screen-share method from the previous section first.
Only start one Weston RDP instance at a time; do not execute multiple startup commands simultaneously, as they will contend for the 3389 port.
Starting as root
Foreground startup:
env LD_LIBRARY_PATH=/opt/qcom/lib:/lib weston --backend=rdp-backend.so \\
  --socket=wayland-rdp-root \\
  --idle-time=0 \\
  --rdp-tls-cert=/etc/weston/rdp.crt \\
  --rdp-tls-key=/etc/weston/rdp.key \\
  --width=1280 \\
  --height=800
Background startup:
nohup env LD_LIBRARY_PATH=/opt/qcom/lib:/lib weston --backend=rdp-backend.so \\
  --socket=wayland-rdp-root \\
  --idle-time=0 \\
  --rdp-tls-cert=/etc/weston/rdp.crt \\
  --rdp-tls-key=/etc/weston/rdp.key \\
  --width=1280 \\
  --height=800 \\
  >/tmp/weston-rdp.log 2>&1 &
Starting as regular user q
Prepare the runtime directory before starting. If you are already logged in as the q user, you can skip the chown command; if you are currently the root user, execute the following commands in full:
mkdir -p /run/user/1007
chown q:q /run/user/1007
chmod 700 /run/user/1007
The following commands must be executed under the q user. If the current prompt is already q@..., execute the commands directly without adding runuser -u q --.
runuser -u q -- is only used when the currently logged-in user is root, to temporarily switch from a root shell to the q user identity for executing the subsequent commands. If you are already logged in as the q user, adding runuser -u q -- may fail because the command is not available in the environment.
Foreground startup:
env -i \\
  HOME=/home/q \\
  USER=q \\
  LOGNAME=q \\
  SHELL=/bin/bash \\
  PATH=/usr/local/sbin:/usr/local/bin:/usr/sbin:/usr/bin:/sbin:/bin \\
  XDG_RUNTIME_DIR=/run/user/1007 \\
  LD_LIBRARY_PATH=/opt/qcom/lib:/lib \\
  weston --backend=rdp-backend.so \\
  --socket=wayland-rdp \\
  --idle-time=0 \\
  --rdp-tls-cert=/home/q/weston-rdp.crt \\
  --rdp-tls-key=/home/q/weston-rdp.key \\
  --width=1280 \\
  --height=800
Background startup:
nohup env -i \\
  HOME=/home/q \\
  USER=q \\
  LOGNAME=q \\
  SHELL=/bin/bash \\
  PATH=/usr/local/sbin:/usr/local/bin:/usr/sbin:/usr/bin:/sbin:/bin \\
  XDG_RUNTIME_DIR=/run/user/1007 \\
  LD_LIBRARY_PATH=/opt/qcom/lib:/lib \\
  weston --backend=rdp-backend.so \\
  --socket=wayland-rdp \\
  --idle-time=0 \\
  --rdp-tls-cert=/home/q/weston-rdp.crt \\
  --rdp-tls-key=/home/q/weston-rdp.key \\
  --width=1280 \\
  --height=800 \\
  >/tmp/weston-rdp.log 2>&1 &
If you are currently executing as the root user, you can also prepend runuser -u q -- before env -i in the above startup commands to switch to the q user for starting the RDP service. For example:
runuser -u q -- env -i \\
  HOME=/home/q \\
  USER=q \\
  LOGNAME=q \\
  SHELL=/bin/bash \\
  PATH=/usr/local/sbin:/usr/local/bin:/usr/sbin:/usr/bin:/sbin:/bin \\
  XDG_RUNTIME_DIR=/run/user/1007 \\
  LD_LIBRARY_PATH=/opt/qcom/lib:/lib \\
  weston --backend=rdp-backend.so \\
  --socket=wayland-rdp \\
  --idle-time=0 \\
  --rdp-tls-cert=/home/q/weston-rdp.crt \\
  --rdp-tls-key=/home/q/weston-rdp.key \\
  --width=1280 \\
  --height=800
Check RDP port listening:
netstat -ltnp | grep 3389
If you see output similar to the following, it indicates that the RDP service has started:
tcp 0 0 0.0.0.0:3389 0.0.0.0:* LISTEN <PID>/weston
Stopping the RDP Service
If you need to stop a temporarily started Weston RDP service, execute:
pkill -f 'weston.*rdp-backend'
Remote Desktop Connection
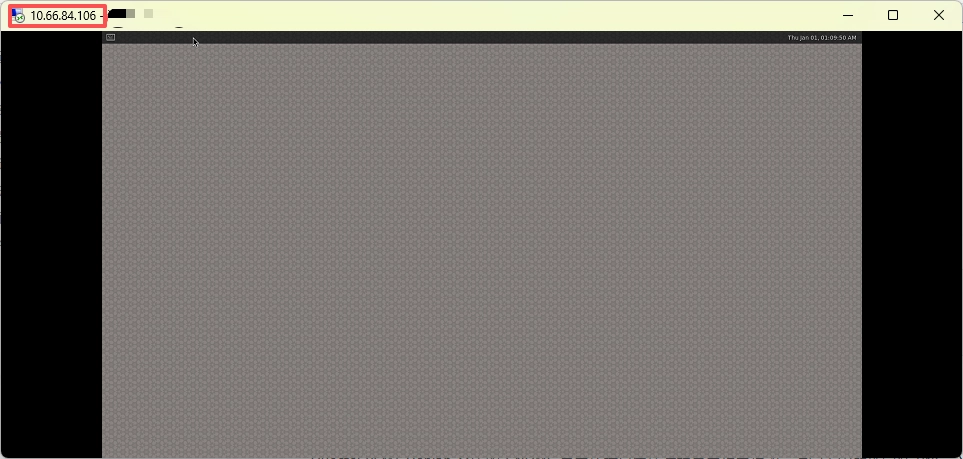
Open “Remote Desktop Connection” on the Windows host.
In the “Computer” input field, enter the development board’s IP address, for example,
10.66.84.106. If you need to manually specify the port, you can enter10.66.84.106:3389.
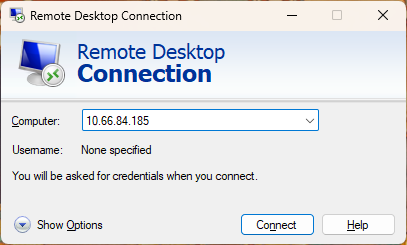
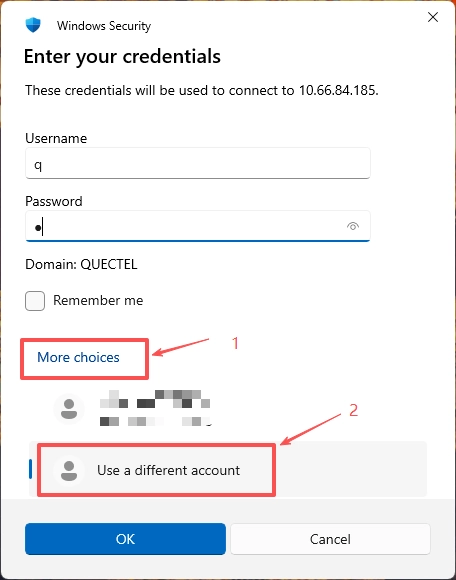
Click “Connect” and enter the username and password shown in the remote desktop settings interface as prompted. If the Windows Security Center prompts for credentials, click More choices, select Use a different account, then enter the username and password configured in the remote desktop settings interface.
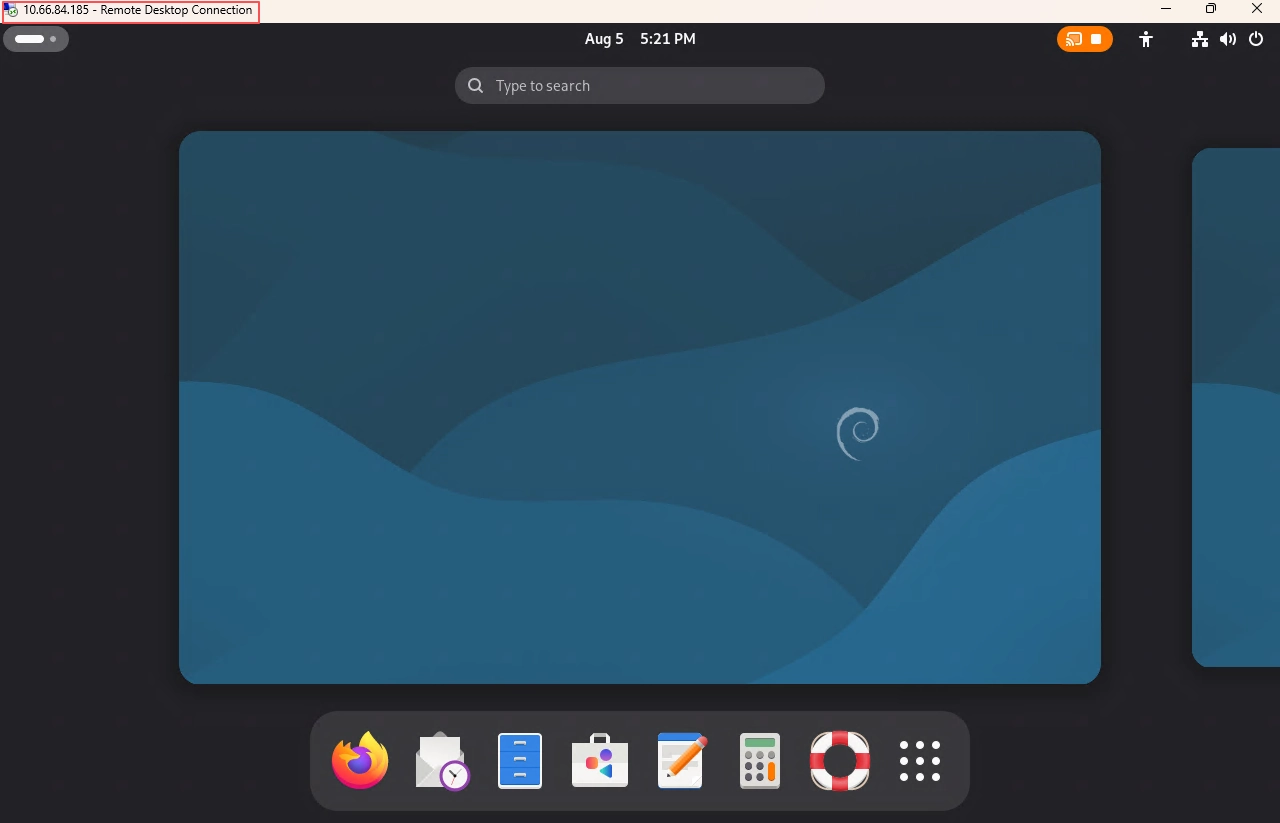
After a successful connection, you can view and operate the Debian desktop on the Windows host. For L1, after a successful connection, you can remotely view and operate the Weston RDP desktop.
Troubleshooting
Symptom |
Possible Cause |
Solution |
|---|---|---|
|
Weston was not compiled with or does not have the RDP backend installed |
Check whether the system contains |
|
The dynamic library path required for running Weston is not set |
Prepend |
Startup prompts a certificate or private key error (L1) |
Incorrect certificate path, missing file, or incorrect private key permissions |
Verify that |
|
The Weston RDP backend did not start successfully |
Check the error information in |
Windows Remote Desktop cannot connect (L1) |
No reachable IP, port 3389 is not listening, or network is unreachable |
On L1, execute |
Connection prompts that the certificate is not trusted (L1) |
A local self-signed certificate is being used |
After confirming the IP is correct, proceed with the connection, or replace with a trusted certificate |
Windows Remote Desktop cannot connect (M1) |
The Windows host and M1 are not on the same LAN |
Verify network connectivity at both ends and re-obtain the M1’s IP address |
Windows Remote Desktop cannot connect (M1) |
The IP address or port was entered incorrectly |
Execute |
Windows Remote Desktop cannot connect (M1) |
Desktop Sharing is not enabled |
Go to |
Can only view the desktop but cannot control the mouse and keyboard (M1) |
Remote Control is not enabled, or the current mode is read-only |
Enable Remote Control, or execute |
Login prompts incorrect username or password (M1) |
The entered credentials do not match those displayed in the remote desktop settings |
Use the username and password displayed in the remote desktop settings interface; if necessary, regenerate or manually change the password |
Remote desktop password becomes invalid after restart or re-login (M1) |
The |
Modify the |
After connection, the display is abnormal or cannot refresh (M1) |
The graphical desktop session state is abnormal |
Confirm that M1 is logged into the graphical desktop, then disconnect and reconnect |
Cannot connect after a network switch (L1/M1) |
The device’s IP address has changed |
Re-execute |